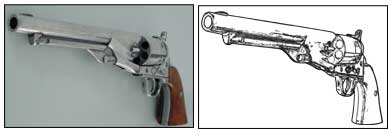
Line Art Tutorial Recommended for Beginner to Intermediate Level Photoshop Users
This Adobe Photoshop tutorial will turn your photos into line art with just a few quick steps. You find that this tutorial works well for most objects!
However you will find that this technique does not work well with photos of humans. You will have to check out the tutorial Turn Photos of People into Line Art for that. Let’s get started…
1) Preparing the Image
First you want to isolate the object and delete the rest of the photo i.e the background.
To cut out the gun I use the Pen Tool . Now to some-up how to use Photoshop’s pen tool in a few sentences isn’t easy…if you have never used the pen tool before, do the PEN TOOL TUTORIAL first.
Remember to make sure the pen tool is set to create a Work Path See below.
Take the pen tool create a path around the gun .
Now go to your Paths palette . (There are 3 tabs on the Layers window, so click on the Paths tab to reveal the Paths palette. See image below).
Load path as a selection. (Click on the dotted circle button at the bottom of the Paths palette). See the image above.
Change your tool to the Move Tool (hit the V key)
Copy this selection. Ctrl + C
Paste Ctrl + V
Go back to your “Layers” palette and rename this new layer “gun”.
Create a new layer (
Fill it white.
Rename it “background” and place it below the “gun” layer. See image below.
Finally make sure your image doesn’t have any colour…
I mage>>A djust>>D esaturate…
(Although it’s not 100% neccessary to desaturate the image, you’ll find that you generally achieve better results if you include this step).
2) Creating the Lines
Working on the “gun” layer apply the Smart Blur filter.Filter >> Blur >> Smart Blur…
Set the Quality to High and the Mode to Edge Only . Adjust the sliders for the Radius and Threshold while watching YOUR preview. When you achieve the desired result click OK. My settings are shown below.
Now invert the image Image >> Adjust >> Invert
Apply a black stroke to your “gun” layer.Edit >> Stroke…
Almost there…
Now to make the existing lines jump out a bit and look more defined use the filter Poster Edges Filter >> Artistic >> Poster Edges
You could stop there because it’s probably looking great now but let’s make it fantastic!Filter >> Artistic >> Cutout…
“Oh yes”
Inevitably you will have a few unwanted squiggles here and there. Just clean them up using your paint tool if you want it perfect.
That’s it!contact me via my contact page if you have any questions.


